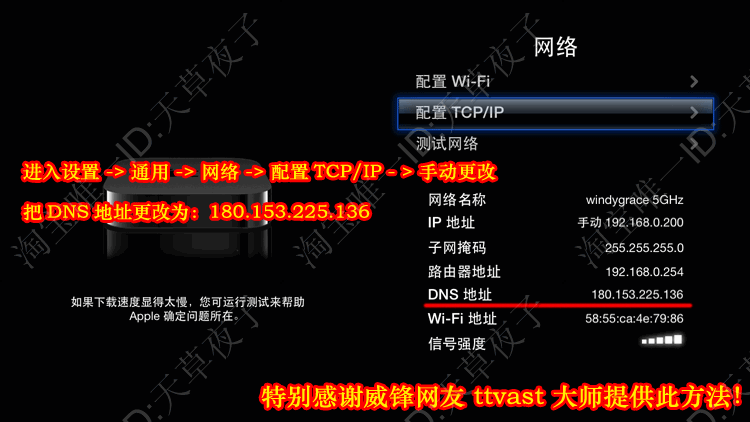
(首先需连接上家里的网络,进入设置 -> 通用 -> 网络)
1.进入设置 -> 通用 -> 时区改为自动
2.进入设置 -> iTunes Store -> 位置 -> United States美国(如主屏幕没有出现很多图标,请尝试选择Hong Kong香港)
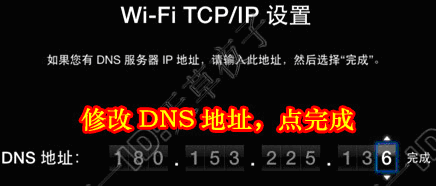
3.修改DNS地址改为: 180.153.225.136(IP地址/子网掩码/路由器地址,点“完成”,不用更改,)
| 5.0 - 5.0.2版本 | 手动 | |||
| 5.1版本 (WiFi接入) | 进入WiFi -> 您的WiFi名称-> 手动配置DNS | |||
| 5.1版本 (网线接入) | 以太网-> 手动配置DNS |
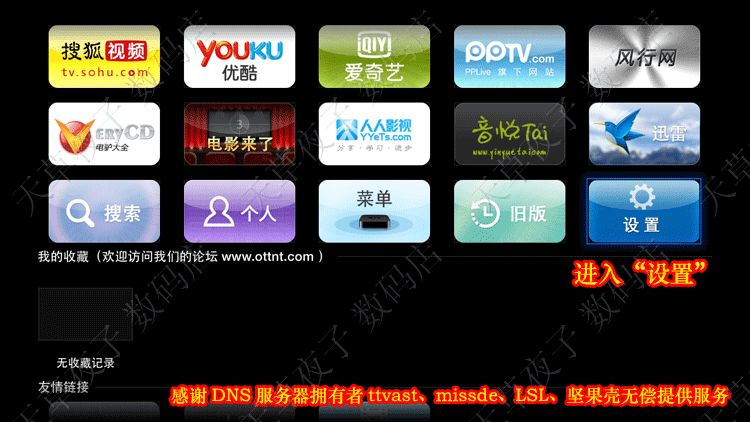
4.最后连续按menu键退出返回到桌面,进入“预告片程序图标”里面就可以观看了。
感谢DNS服务器的多位提供者(TTvast、missle、LSL、坚果壳在线)无偿提供此项服务。
| DNS服务器地址 | 宽带用户 优先选择 | 说明 | 个人直播功能 | 服务器 所在地 |
| 180.153.225.136 | 电信 | 主推荐,可“友情连接”到其他DNS服务器 | 有,可添加 | 上海 |
| 211.151.45.4 | 网通、联通 | 主推荐,可“友情连接”到其他DNS服务器 | 有,可添加 | 北京 |
| 210.129.145.150 | 海外 | 有,可添加 | 国外 | |
| 111.68.8.179 | 海外 | 次推荐,可“友情连接”到其他DNS服务器 | 有,可添加 | 香港 |
| 58.215.188.82 | 电信 | 江苏 |
自己PING 相应的DNS服务器,哪个快用哪个!
注意:
1.Apple TV会提示有6.0新版本更新提示,建议不要更新,没有任何新功能,否则需要重新改DNS,保持原状即可。
2.如设置DNS后,没有“预告片”程序图标或奇异等可播放的视频内容,请尝试重启Apple TV。(设置 -> 通用 -> 重新启动)
3.移动、铁通、长宽等第三方宽带运营商的用户设置不成功,可以尝试更换以上DNS地址。
4.如设置不成功,请进入设置 -> 通用 -> 还原 -> 还原所有设置,重新设置每一个步骤。
5.如进入设置 -> iTunes Store -> 位置下是空的(无法选择国家),您可能需要将TV降级至5.02版本。
降级教程参考链接:http://bangpai.taobao.com/group/thread/15040729-277979858.htm?spm=0.0.0.75.IGVZiy
6.如使用宽带运营商赠送的路由器,可能会限制DNS功能(仅很少用户反馈)。不管如何,我们还是建议增加一个自已的无线路由器。
7.建议用户根据自已的宽带类型来优先选择DNS地址,否则可能会出现片源响应速度缓慢,播放中断等不稳定现象。
8.因为这些DNS服务器不是我们在管理和维护,节目内容随时会无法正常观看,所以只有等待自动修复。
IOS 5.0的设置界面:(注意把IP地址、子网掩码、路由器地址直接选择“完成”跳过。)
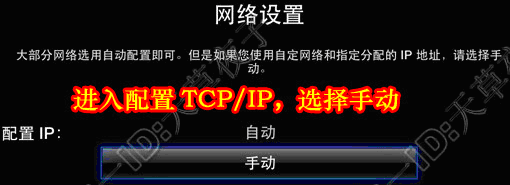
IOS 6.0的设置界面:直接配置DNS为手动更改就好了,更方便了。
配置完成DNS地址后,按Menu键退到桌面,进入“预告片程序图标”即可。
会出现很多‘视频’和‘功能菜单’的图标。

--------------------------------------------------------------------------------------------------------
预告片中如何添加自定义的个人播放地址?
1. 进入“预告片” -> “菜单” -> “登入/注册”账户
2.电脑上打开这个网址:www.atvttvv.net,使用刚才注册的账户登录,之后就可以编辑个人链接,在“链接列表(名字 地址)”,把下列所有的地址全部复制你粘贴进去,更新列表。(服务器列表不更改)
3. 最后在“预告片” -> “个人”, 就可以看到播放列表。(未添加直播地址,里面是空的)
--------------------------------------------------------------------------------------------------------------
个人 如何添加“优酷”?
1. 首先在优酷选好想看的影片,通过优酷HTML5转m3u8工具转换得到m3u8地址,
2. 然后进入http://www.atvttvv.net/ 把生成的m3u8地址复制到自已的列表中。
3. 最后Apple TV打开“预告片” -> 进入“个人” -> 进入“个人链接”,就可以看到播放列表。
以20120810康熙来了为例:
在优酷的地址为 http://v.youku.com/v_show/id_XNDM3NjQxNDYw.html
通过转换m3u8,地址为 http://v.youku.com/player/getRealM3U8/vid/XNDM3NjQxNDYw/type//video.m3u8
优酷HTML5转m3u8工具 (下载地址)
http://www.kuaipan.cn/file/id_37757727514034255.htm